Welcome to my getting started with Web2py tutorial.
This tutorial assumes very little on the part of the reader, some knowledge of a programming language will certainly help, but if not don’t worry. I’ll take you from installation through to v1 of your application.
If you don’t want to copy from the tutorial, the full source is hosted on github.
Last time we created the Models as well as the Controller and View for the home page. The next page to look at is the Wall. The Wall is specific to a given user and contains their profile details as well as their weet history.

As before we start with in the default.py Controller, add the following method to manage the behaviour for the wall.
# show user's wall, showing profile and posts
def wall():
   #Determine which user's wall is to be displayed
   user = db.auth_user(request.args(0) or me)
   #If user is invalid, return to the home page
   if not user:
       redirect(URL('home'))
   weets = db(db.weets.posted_by==user.id).select(orderby=~db.weets.posted_on,limitby=(0,100))
   return locals()
The first thing to do is determine whose wall it is that we need to display. The line responsible is worth a closer look.
user = db.auth_user(request.args(0) or me)
We have already seen db used as a means to access the database but we have not yet come across ‘request’. Request is an object available to all Controller actions and provide details of the http request that instigated the Controller action being called.
In this case we check the first (technically the zeroth) argument of the request. An argument is best described by example
http://127.0.0.1:8000/witter/default/wall/myargument/myotherargument/
In this specific instance the argument denotes the user id and so the line in question checks if a user id has been specified, if not it assumes that the requester are themselves logged in and trying to access their own wall. If neither case is true then the browser is redirected to the home page.
After that we pull out all the weets for the given user and return local variables, which are then made available to the View.
We will need a new View file called default/wall.html. As before you can create it via the application admin page.
Replace the default code with :-
{{extend 'layout.html'}}
<h2>Profile</h2>
{{=crud.read(db.auth_user,user)}}
<h2>Messages</h2>
{{for weet in weets:}}

{{=name_of(weet.posted_by)}} on {{=weet.posted_on}}:
{{=MARKMIN(weet.body)}}

{{pass}}
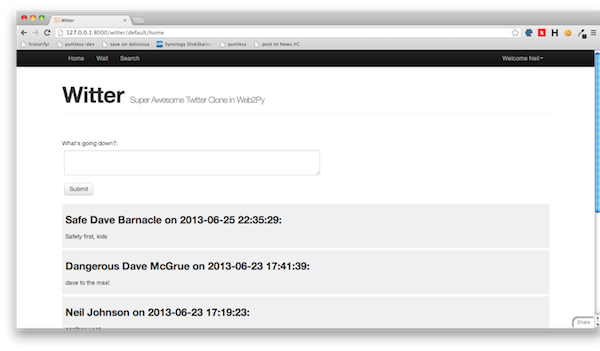
We’ve met crud before, it provides a nice high level abstraction to access database information, in this instance we are using it to pull the profile information about the user. The next section loops through all the weets generated in the Controller and presents them in chronological order – this very much the same logic as we saw on the home page. You can a look for yourself at http://127.0.0.1:8000/witter/default/wall or just navigate there from the Witter home page using the navigation bar at the top.
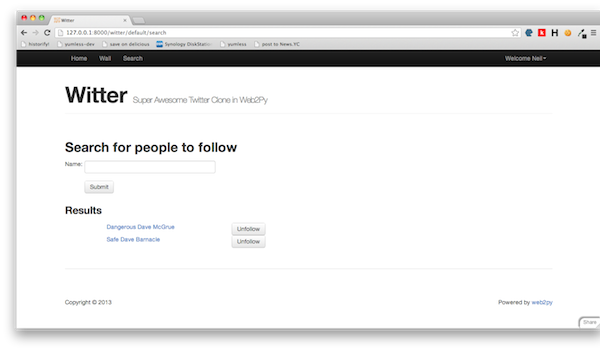
Search
For the grand finale let’s look at search.
The purpose of this page is to allow a user to search for their friends and then follow them. In some senses it is the simplest of the pages, but as we shall see it contains some interesting functionality behind the scenes.
Firstly, let’s take a look at the Controller, add the following to default.py
# a page for searching for other users
@auth.requires_login()
def search():
   form = SQLFORM.factory(Field('name',requires=IS_NOT_EMPTY()))
   if form.accepts(request):
       tokens = form.vars.name.split()
       query = reduce(lambda a,b:a&b,
                      [db.auth_user.first_name.contains(k)|db.auth_user.last_name.contains(k)
                           for k in tokens])
       people = db(query).select(orderby=db.auth_user.first_name|db.auth_user.last_name,left=db.followers.on(db.followers.followee==db.auth_user.id))
   else:
       people = []
   return locals()
The first thing we do is create the search form, we do this like so
SQLFORM.factory(Field('name',requires=IS_NOT_EMPTY()))
The SQLFORM.factory can be used to generate a from an existing database table, or, as in this case can be used to generate a form from scratch. The form is very simple and takes a single input ‘name’.
The rest of the Controller handles the action once the input has been received – this is what the follow is checking for:-
if form.accepts(request):
The remaining code searches for the the search terms amongst other users registered in witter and plugs them into ‘people’, it also determines which of those people the user already follows – the View is going to rely on this follower information.
The Search View
So far so good, now let’s take a look at the View, you’ll need to create a file called default/search.html under the Views section. Replace the default code with:-
{{extend 'layout.html'}}
<h2>Search for people to follow</h2>
{{=form}}
{{if people:}}
<h3>Results</h3>
{{for user in people:}}
{{=A(name_of(user.auth_user), _href=URL('wall',args=user.auth_user.id))}}
{{if user.followers.followee:}}
Unfollow
{{else:}}
Follow
{{pass}}
</div>
{{pass}}
{{pass}}
Much of this will now be familiar – we pull in the standard template, then the form and then iterate over the ‘people’ (if any) returned by the Controller. Where it get’s interesting is the button definitions.
Firstly we check if the searched for user is already being followed by the search, this means the button can offer to follow unfollowed witterers and unfollow the followed. So far so good, but what does this do?
<button onclick="ajax('{{=URL('follow',args=('follow',user.auth_user.id))}}',[],null);$(this).parent().html('Followed')">Follow</button>
Before I can answer that I need to explain about AJAX. AJAX stands for Asynchronous JavaScript and XML, but this name is largely misleading since it needn’t be asynchronous and needn’t use XML. In short AJAX is a technique for creating dynamic web pages, it allows pages to be updated without needing to reload the entire page, and it does this by exchanging small amounts of information with the server behind the scenes.
Strictly speaking I could have passed on using AJAX in this tutorial, but it is a really useful technique a very simple to implement.
In layman’s terms the button definition says, when the button is clicked make a poke to another Controller action called ‘follow’ and send the arguments ‘follow’ and the user id. Once this is done replace the button (which read ‘Follow’) to be some text that read ‘Followed’.
A final note about the search View is the use of the css classes ‘row’ and ‘span’. These are provided by Bootstrap which is a a popular front end frame work. Bootstrap is not part of Web2py but Web2py does support it out of the box. In this tutorial I’ve deliberately avoided focusing on the look and feel of the app, but Bootstrap provides all the tools necessary to create an attractive web application.
AJAX Callback
And that’s it for the , however, what about the follow action in the Controller? We’ve not implemented that yet. Here goes, add the following to the default.py Controller:-
# this is the Ajax callback
@auth.requires_login()
def follow():
if request.env.request_method!='POST': raise HTTP(400)
if request.args(0) =='follow' and not db.followers(follower=me,followee=request.args(1)):
# insert a new friendship request
db.followers.insert(follower=me,followee=request.args(1))
elif request.args(0)=='unfollow':
# delete a previous friendship request
db(db.followers.follower==me)(db.followers.followee==request.args(1)).delete()
The most interesting line is the first one.
if request.env.request_method!='POST': raise HTTP(400)
When a browser makes a request to read a web page it uses an HTTP method called GET, this is exactly what you do everytime you point your browser at Google. There are however other HTTP methods, POST being one of them, POST is used to transmit that is expected to change the state of the application. The AJAX call that we initiate in the search,html View is a POST request.
Since this Controller action is there solely to support AJAX calls from search.html, it does not expect to handle HTTP GET requests and rejects them. You can try this for yourself by trying to View http://127.0.0.1:8000/witter/default/follow which should result in a blank page and a error message complaining of a ‘bad request’.
Right so there we have it – all pages are complete, in order to try out the search and folllow/unfollow functionality you’ll need to register to extra users and have them follow each other. Be sure to notice that it is not necessary to refresh the search page every time to make a follow/unfollow request.
So in conclusion what have we achieved?
We created a new web2py application called Witter, created three pages (and an AJAX method) supporting a home page, a user wall and a user search and all backed by a database that will persist the data over time.
Are we done?
Well perhaps, I certainly am.
This tutorial has taken you from nothing at all to a functioning web2py application, that can be extended as you please.
If you are searching for ideas, you might want to move the search functionality into the home page and extend it so that search covers all weets (much like Twitter does). The UI could certainly do with a spruce up (and there are plenty of CSS tutorials out there) and as a final task you could put the thing live, gain awesome traction (due to your custom tweaks) and take over the social media world.
Feedback on this tutorial much appreciated, I’ll leave you with some useful links.
- web2py home page
- web2py online book – the most comprehensive web2py resource online
- web2py mailing list,
- web2py examples
- The Witter source on Github
- Learn Python the Hardway
- Bootstrap – Everything you need to get the site look great
- Selenium – Functional testing for your application
- Web Development Check List http://webdevchecklist.com/
Twitter Clone Tutorial in Web2py Part 1 – Getting started
Welcome to my getting started with Web2py tutorial.
This tutorial assumes very little on the part of the reader, some knowledge of a programming language will certainly help, but if not don’t worry. I’ll take you from installation through to v1 of your application.
If you don’t want to copy from the tutorial, the full source is hosted on github.
Why Web2py?
Web2py is a fantastic web development framework for Python, it focuses on
- Ease of use
- Rapid development
- Security
Additionally it had a excellent documentation and a highly responsive mailing list, these factors combine to make it a great place to start for those new to web development and programming in general.
To give an idea of just how easy it is to get going this tutorial we will build a twitter clone from scratch – nothing too flashy, but enough to demonstrate some core ideas to get you going.
The Twitter Clone – Witter
We’ll call the app Witter and steal other Twitterisms such as weets and weeting.
The app will be made up of three pages
- A home page, that displays all the weets of the user as well as those of anyone they follow
- A wall page, that displays profile details of a given user as well as their weets
- A search page that can be used to find others users and follow and unfollow
Getting Web2Py
There are a number of ways to do this, the easiest is to download the binary packages available for OS X and Windows. The binaries includes everything you need including a Python interpreter and an integrated development environment. Linux users will need to download the source, if you are comfortable with Linux I’m going to assume that you are comfortable with installing web2py.
Once downloaded you have everything you need and it is time to start web2py for the first time.
On OS X you’ll want to copy your newly downloaded file to your Applications folder, then double click just as you would any normal application to launch.
On Windows, copy web2py.exe to Program Files and double click to launch:
When prompted enter an admin password, and click ‘Start Server’ and soon after you will be presented with the web2py welcome app.
This is great place to start, including some useful examples and documentation, for now just click on the ‘Administrative Interface’ button on the right hand side to reach the site view of the administrative interface.
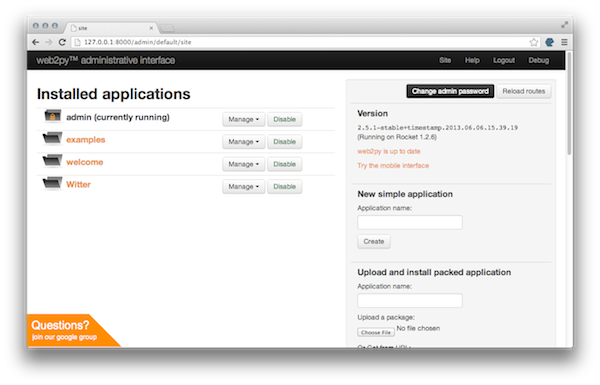
Creating your new application
The first thing to do is to create the new application, on the right hand side under ‘New Simple Application’ enter ‘witter’, this will be the name of our Twitter clone. With a bit of luck you are now looking at the Witter administrative interface – we are going to spend some time taking a tour of this page, but before we do that let’s head to the Witter home page. In a separate tab point your browser to
Congratulations – this is your brand new application, you’ll notice that it looks very similar to the welcome application, it is just using the same default content. We soon get rid of that in the next post as we start in earnest on Witter.


