Welcome to my getting started with Web2py tutorial.
This tutorial assumes very little on the part of the reader, some knowledge of a programming language will certainly help, but if not don’t worry. I’ll take you from installation through to v1 of your application.
If you don’t want to copy from the tutorial, the full source is hosted on github.
Last time we created the Models as well as the Controller and View for the home page. The next page to look at is the Wall. The Wall is specific to a given user and contains their profile details as well as their weet history.

As before we start with in the default.py Controller, add the following method to manage the behaviour for the wall.
# show user's wall, showing profile and posts
def wall():
   #Determine which user's wall is to be displayed
   user = db.auth_user(request.args(0) or me)
   #If user is invalid, return to the home page
   if not user:
       redirect(URL('home'))
   weets = db(db.weets.posted_by==user.id).select(orderby=~db.weets.posted_on,limitby=(0,100))
   return locals()
The first thing to do is determine whose wall it is that we need to display. The line responsible is worth a closer look.
user = db.auth_user(request.args(0) or me)
We have already seen db used as a means to access the database but we have not yet come across ‘request’. Request is an object available to all Controller actions and provide details of the http request that instigated the Controller action being called.
In this case we check the first (technically the zeroth) argument of the request. An argument is best described by example
http://127.0.0.1:8000/witter/default/wall/myargument/myotherargument/
In this specific instance the argument denotes the user id and so the line in question checks if a user id has been specified, if not it assumes that the requester are themselves logged in and trying to access their own wall. If neither case is true then the browser is redirected to the home page.
After that we pull out all the weets for the given user and return local variables, which are then made available to the View.
We will need a new View file called default/wall.html. As before you can create it via the application admin page.
Replace the default code with :-
{{extend 'layout.html'}}
<h2>Profile</h2>
{{=crud.read(db.auth_user,user)}}
<h2>Messages</h2>
{{for weet in weets:}}

{{=name_of(weet.posted_by)}} on {{=weet.posted_on}}:
{{=MARKMIN(weet.body)}}

{{pass}}
We’ve met crud before, it provides a nice high level abstraction to access database information, in this instance we are using it to pull the profile information about the user. The next section loops through all the weets generated in the Controller and presents them in chronological order – this very much the same logic as we saw on the home page. You can a look for yourself at http://127.0.0.1:8000/witter/default/wall or just navigate there from the Witter home page using the navigation bar at the top.
Search
For the grand finale let’s look at search.
The purpose of this page is to allow a user to search for their friends and then follow them. In some senses it is the simplest of the pages, but as we shall see it contains some interesting functionality behind the scenes.
Firstly, let’s take a look at the Controller, add the following to default.py
# a page for searching for other users
@auth.requires_login()
def search():
   form = SQLFORM.factory(Field('name',requires=IS_NOT_EMPTY()))
   if form.accepts(request):
       tokens = form.vars.name.split()
       query = reduce(lambda a,b:a&b,
                      [db.auth_user.first_name.contains(k)|db.auth_user.last_name.contains(k)
                           for k in tokens])
       people = db(query).select(orderby=db.auth_user.first_name|db.auth_user.last_name,left=db.followers.on(db.followers.followee==db.auth_user.id))
   else:
       people = []
   return locals()
The first thing we do is create the search form, we do this like so
SQLFORM.factory(Field('name',requires=IS_NOT_EMPTY()))
The SQLFORM.factory can be used to generate a from an existing database table, or, as in this case can be used to generate a form from scratch. The form is very simple and takes a single input ‘name’.
The rest of the Controller handles the action once the input has been received – this is what the follow is checking for:-
if form.accepts(request):
The remaining code searches for the the search terms amongst other users registered in witter and plugs them into ‘people’, it also determines which of those people the user already follows – the View is going to rely on this follower information.
The Search View
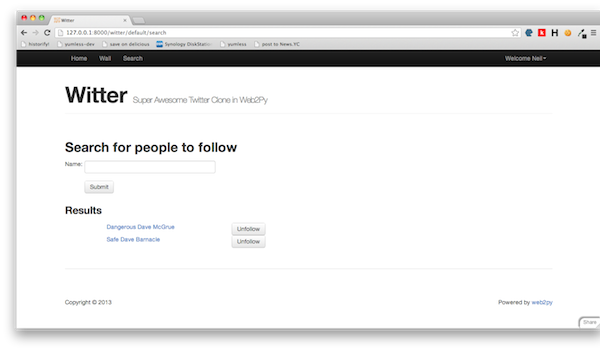
So far so good, now let’s take a look at the View, you’ll need to create a file called default/search.html under the Views section. Replace the default code with:-
{{extend 'layout.html'}}
<h2>Search for people to follow</h2>
{{=form}}
{{if people:}}
<h3>Results</h3>
{{for user in people:}}
{{=A(name_of(user.auth_user), _href=URL('wall',args=user.auth_user.id))}}
{{if user.followers.followee:}}
Unfollow
{{else:}}
Follow
{{pass}}
</div>
{{pass}}
{{pass}}
Much of this will now be familiar – we pull in the standard template, then the form and then iterate over the ‘people’ (if any) returned by the Controller. Where it get’s interesting is the button definitions.
Firstly we check if the searched for user is already being followed by the search, this means the button can offer to follow unfollowed witterers and unfollow the followed. So far so good, but what does this do?
<button onclick="ajax('{{=URL('follow',args=('follow',user.auth_user.id))}}',[],null);$(this).parent().html('Followed')">Follow</button>
Before I can answer that I need to explain about AJAX. AJAX stands for Asynchronous JavaScript and XML, but this name is largely misleading since it needn’t be asynchronous and needn’t use XML. In short AJAX is a technique for creating dynamic web pages, it allows pages to be updated without needing to reload the entire page, and it does this by exchanging small amounts of information with the server behind the scenes.
Strictly speaking I could have passed on using AJAX in this tutorial, but it is a really useful technique a very simple to implement.
In layman’s terms the button definition says, when the button is clicked make a poke to another Controller action called ‘follow’ and send the arguments ‘follow’ and the user id. Once this is done replace the button (which read ‘Follow’) to be some text that read ‘Followed’.
A final note about the search View is the use of the css classes ‘row’ and ‘span’. These are provided by Bootstrap which is a a popular front end frame work. Bootstrap is not part of Web2py but Web2py does support it out of the box. In this tutorial I’ve deliberately avoided focusing on the look and feel of the app, but Bootstrap provides all the tools necessary to create an attractive web application.
AJAX Callback
And that’s it for the , however, what about the follow action in the Controller? We’ve not implemented that yet. Here goes, add the following to the default.py Controller:-
# this is the Ajax callback
@auth.requires_login()
def follow():
if request.env.request_method!='POST': raise HTTP(400)
if request.args(0) =='follow' and not db.followers(follower=me,followee=request.args(1)):
# insert a new friendship request
db.followers.insert(follower=me,followee=request.args(1))
elif request.args(0)=='unfollow':
# delete a previous friendship request
db(db.followers.follower==me)(db.followers.followee==request.args(1)).delete()
The most interesting line is the first one.
if request.env.request_method!='POST': raise HTTP(400)
When a browser makes a request to read a web page it uses an HTTP method called GET, this is exactly what you do everytime you point your browser at Google. There are however other HTTP methods, POST being one of them, POST is used to transmit that is expected to change the state of the application. The AJAX call that we initiate in the search,html View is a POST request.
Since this Controller action is there solely to support AJAX calls from search.html, it does not expect to handle HTTP GET requests and rejects them. You can try this for yourself by trying to View http://127.0.0.1:8000/witter/default/follow which should result in a blank page and a error message complaining of a ‘bad request’.
Right so there we have it – all pages are complete, in order to try out the search and folllow/unfollow functionality you’ll need to register to extra users and have them follow each other. Be sure to notice that it is not necessary to refresh the search page every time to make a follow/unfollow request.
So in conclusion what have we achieved?
We created a new web2py application called Witter, created three pages (and an AJAX method) supporting a home page, a user wall and a user search and all backed by a database that will persist the data over time.
Are we done?
Well perhaps, I certainly am.
This tutorial has taken you from nothing at all to a functioning web2py application, that can be extended as you please.
If you are searching for ideas, you might want to move the search functionality into the home page and extend it so that search covers all weets (much like Twitter does). The UI could certainly do with a spruce up (and there are plenty of CSS tutorials out there) and as a final task you could put the thing live, gain awesome traction (due to your custom tweaks) and take over the social media world.
Feedback on this tutorial much appreciated, I’ll leave you with some useful links.
- web2py home page
- web2py online book – the most comprehensive web2py resource online
- web2py mailing list,
- web2py examples
- The Witter source on Github
- Learn Python the Hardway
- Bootstrap – Everything you need to get the site look great
- Selenium – Functional testing for your application
- Web Development Check List http://webdevchecklist.com/
Twitter Clone Tutorial in Web2py Part 2 – The Home Page
Welcome to my getting started with Web2py tutorial.
This tutorial assumes very little on the part of the reader, some knowledge of a programming language will certainly help, but if not don’t worry. I’ll take you from installation through to v1 of your application.
If you don’t want to copy from the tutorial, the full source is hosted on github.
Last time we set up Web2py and created our application, Witter. This time around we’ll down and dirty with writing our own functionality, but before we do that, let’s register ourselves since it will save us a job later.
Register a new user
From http://127.0.0.1:8000/witter Click ‘Login’ on the top right and then ‘Register’, enter your detail into the form and hit submit. Welcome! You are the first ever user of your application.
While this is extremely cool, it will be even cooler once Witter actually does something, and for that we need to work with the Admin interface.
The Admin Interface
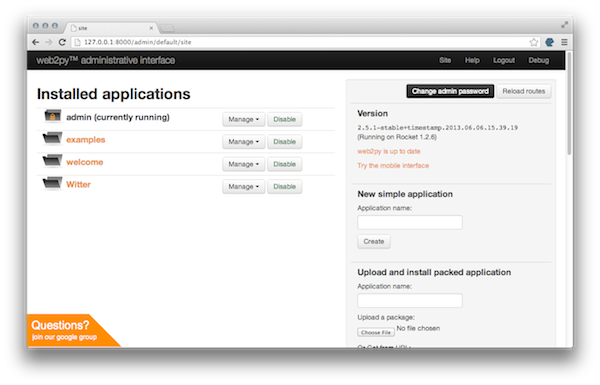
The Admin interface can be found at from http://127.0.0.1:8000/admin/default/design/witter and provides access to all the files you will need to create your application, there is a lot to take in, and for now we are are going to focus on three sections that we will be editing extensively – The Models, the Views and Controllers.

Model-View-Controller MVC
Before we go any further I need to explain some theory. Model-View-Controller or MVC is highly popular web application design pattern. This means that over many years of sweat and toil it is generally considered to the be the best way to lay out your code. It is certainly not the only way, and there are many MVC variations, but Web2py is rather fond of the MVC pattern and this is what we’ll use to create Witter.
So what does working with MVC mean?
We let’s start by defining some terms, I’m going to steal directly from wikipedia
Model–view–controller (MVC) is a software architecture pattern which separates the representation of information from the user’s interaction with it.[1][2] The model consists of application data, business rules, logic, and functions. A view can be any output representation of data, such as a chart or a diagram. Multiple views of the same data are possible, such as a bar chart for management and a tabular view for accountants. The controller mediates input, converting it to commands for the model or view.[3] The central ideas behind MVC are code reusability and separation of concerns.[4]
It goes onto to define the role of each component
In addition to dividing the application into three kinds of components, the MVC design defines the interactions between them.[5]
-
A controller can send commands to its associated view to change the view’s presentation of the model (e.g., by scrolling through a document). It can also send commands to the model to update the model’s state (e.g., editing a document).
-
A model notifies its associated views and controllers when there has been a change in its state. This notification allows the views to produce updated output, and the controllers to change the available set of commands. A passive implementation of MVC omits these notifications, because the application does not require them or the software platform does not support them.[6]
-
A view requests from the model the information that it needs to generate an output representation to the user.”
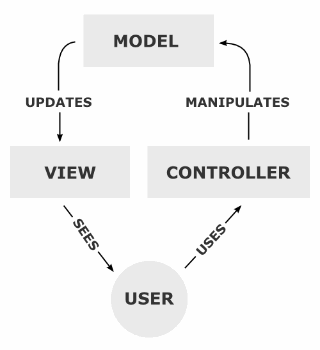
In summary, we define how our data will be laid out in the Models, define how it will be presented in the Views and define how the user can interact and modify it in the Controller.
Right now, you might be wondering why this is all so important. For the moment I’m going to ask you to trust me, and work safe in the knowledge doing so will save you time, effort and save the lives of puppies.
Getting going – the Models
Okay, so we have the application up and running, we are now armed with the necessary theory, it’s time to dive in. This is where is really starts to get interesting.
We’ll start with the Models, we can actually reuse the existing ‘db’ Model file, so click edit and we’ll take a look around. You’ll notice that there is a lot of information here, along with housing our data Model the db file also provides some initialisation and sensible defaults for our application.
By all means take a look through but I want to call two lines of special interest:-
db = DAL('sqlite://storage.sqlite',pool_size=1,check_reserved=['all'])
DAL stands for Database Abstraction layer, and provides an API that maps Python objects into database objects. We will make extensive use of the DAL in our application. In this case we are using an SQLite database to back the DAL. Using SQLite will make absolutely no difference to how we write our application since we talk to the DAL not the database. This means that we can swap in and out databases as we please. To start with SQLite is the perfect choice to get going quickly, though we would want something meatier for a production environment.
auth = Auth(db)
Auth is a class that implements, the Web2py role based authorisation API, this will allow us to provide for user registration, login as well as restricting access to certain pages. For instance, once I have registered, it will provide me with a form to let me change my password, and at the same time ensure that I am the only person who can view it.
At the beginning of this tutorial I referenced the Web2py stated goal of Security. Auth and the DAL abstract many of these concerns on behalf of the developer. For instance the DAL makes it impossible to succumb to an SQL injection attack.
In addition to the concept of a user, we will need two additional entities – (t)weets and followers.
Add the following to the bottom of the db.py Model file
# a table to store posted weets
db.define_table('weets',
Field('body','text',requires=IS_LENGTH(140,1),label="What's going down?"),
Field('posted_on','datetime',readable=False,writable=False),
Field('posted_by','reference auth_user',readable=False,writable=False))
#a table to store follower relationships
db.define_table('followers',
Field('follower','reference auth_user'),
Field('followee','reference auth_user'))
#Convenience methods to make code more compact
me = auth.user_id
def name_of(user): return '%(first_name)s %(last_name)s' % user
So for a weet we store the body that must not exceed 140 characters, when it was posted and by whom.
Separately, in followers, we store which users follow which other users, each relationship has it’s own entry in the same. ‘auth_user’ is reference to the auth_user table defined by Auth and by explicitly calling out the relationship we ensure that it is not possible to add bogus data into the followers table.
We’ll side step ‘me’ and ‘name_of’ for now and revisit them as they come up later.
Save the default.py and click on ‘edit’ that sits on the top nav bar, this will return you to the Witter admin page from here we need to edit the menu.py Model file. This file configures the look of the menu and also houses meta data about the application.
Remove the existing content and enter the following in menu.py
response.title = "Witter"
response.subtitle = "Super Awesome Twitter Clone in Web2py"
response.menu = [
(T('Home'), False, URL('default','home')),
(T('Wall'), False, URL('default','wall')),
(T('Search'), False, URL('default','search')),
]
This code sets the apps name and sub-title as well as defining the links on the navigation bar.
With the data Model out of the way, it is time to look at Controller file. Once again, save the menu.py and click on ‘edit’ that sits on the top nav bar, under Controllers click edit on ‘default.py’.
default.py also comes with some pre-existing content, you’ll notice a user method – this ties in with the Auth class we came across in the Model exposing functionality to manage user registrations and logins.
So far everything we have seen, has focused on definitions. In the Controllers we will start to use python in anger to determine how our application should behave. I will not attempt to provide an introduction to python in this tutorial but will recommend the Web2py python introduction as well as Zed Shaw’s Learn Python the Hard Way(‘The hard way is easier’).
The Home Page Controller
Our first custom Controller method will be the home page, this is the page from which we can post a weet as well as listing weets from other users that we follow – it also contains our own weets.
Every method in the Controller is exposed by the application, so let’s have a play. Add a new method called ‘home’ like so, adding to the bottom of the file is fine.
def home(): return "Hello from Witter App"
Now point your browser to http://127.0.0.1:8000/witter/default/home
You should see a page empty but for your message. Take a look at the url for a moment – witter is the application, default is the Controller file and home is the specific method. This means that we can write multiple Controller methods and reach them via the same URL scheme changing the final element to match the new method name.
Getting the home method working is good going, but if Witter is going to challenge Twitter on the big stage we are going to need to make some changes.
Replace your previous home method with the following, this is the Controller action for the home page.
@auth.requires_login()
def home():
'''First point of call, contains all weets and all weets of those you follow'''
#configure defaults, so they not appear on the form
db.weets.posted_by.default = me
db.weets.posted_on.default = request.now
#create form with which the user can submit weets
crud.settings.formstyle = 'table2cols'
form = crud.create(db.weets)
#determine who the user follows
my_followees = db(db.followers.follower==me)
me_and_my_followees = [me]+[row.followee for row in my_followees.select(db.followers.followee)]
#Pull all weets to be displayed
weets = db(db.weets.posted_by.belongs(me_and_my_followees)).select(orderby=~db.weets.posted_on,limitby=(0,100))
return locals()
Woooh! Hold on now, there is a lot going on here. Let’s go through this slowly.
This method uses both ‘db’ and ‘me’ that we defined earlier in the db.py Model. Any variable defined in a Model file is automatically available in all Controllers (and Views). This why we can use these variables without needing to formally import them.
So every time we see ‘db’ we know that some activity against the DAL and therefore the database is going to occur. Similarly every time we see ‘me’ we know it refers to the user who is logged in.
So, back to the home method. The very first line
@auth.requires_login()
Is a method decorator that ensures that this page is only accessible to logged in users. Users not logged in, will be redirected to the login page.
Next we assign some default values to fields in the weet entity before using the crud plugin (also defined in db.py) to auto-generate a form for us. This is the form that we will use to post weets. Crud stands for Create, Read, Update, Delete I don’t want to dwell on it too much for now, other than to say it is a useful tool to create forms and validation logic.
Next we need to pull out the weets that those that we follow have weeted, as well as pulling out our own. The final lines act on the DAL to select out the relevant details to pull out only the weets we are interested in.
Finally we return ‘locals()’ this makes the method’s local variables available to the View, which we will go into in just a second. We have one final task before leaving the Controller and that is to replace the index method with:-
def index():
if auth.user: redirect(URL('home'))
return locals()
The index is the default Controller and is where you end up after naviagting to http://127.0.0.1:8000/witter This method simply checks if you are logged in and if so redirects to the ‘home’ page. If not you are presented with the default landing page that you saw when you first started up Web2py.
Now to learn more about Views
The Home Page View
Remember the View is there to present the information stored in the Model, after processing via the Controller. Separately, as we shall see, it also provides the user a means to interact with the application via the Controller.
In the first attempt at the home method ‘’Hello from Witter App” we made use of the default View. The default is useful for checking that everything is working but for a high quality application such as Witter we will need something more sophisticated.
From the application adminstration page scroll down until you see the Views section and create a new file called default/home.html The path of the file denotes that it is the View of the default/home Controller.
Replace the default code with the following:-
{{extend 'layout.html'}}
{{=form}}
$('textarea').css('width','600px').css('height','50px');
{{for weet in weets:}}
{{=name_of(weet.posted_by)}} on {{=weet.posted_on}}:
{{=MARKMIN(weet.body)}}
{{pass}}
I’ll explain what the View is doing in second but for now, just save the file and point your browser at http:127.0.0.1:8000/witter/default/home If you are no longer logged in you will be prompted to provide your username and password.
This is your landing page – what a difference! Along the top left we have the Witter navigation controls, which we specified in the menu.db Model and immediately underneath a text area in which to enter weets.
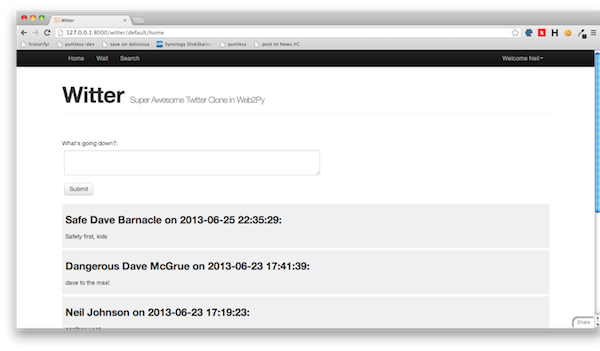
Initially, there isn’t very much to see. The next step is to go ahead and make a weet (you can see weets from multiple users in the picture above). Enter some timeless phrase into the text area and hit submit. The page will refresh and low and behold your weet is preserved for eternity.
So how on earth has this happened? Let’s go back to the default/home.html View.
The View is standard html file and as you might expect contains html tags to mark up the content, but it also contains some lines enclosed by ‘{{ }}’. The contents of these lines are Python and allow you to dynamically create the page content.
The first line draws in the layout.html file, this is base template that provides things like a nav bar and a footer and generally makes our page look a bit more like a website. You can take a closer look from the application admin interface under Views.
Next up, we enter the form as created in the ‘home’ Controller, before modifying the size of the text area in the <script> tags.
Here’s where it starts to get interesting. In the Controller we specified a variable called weets that contained details of all the weets to display on the page.
The View loops through all the weets
{{for weet in weets:}}
For each one it displays how weeted, when, and then the body of the weet. The reason this is so interesting is that the content has been created dynamically and is entirely dependent on the weets pulled from the Controller.
So we have out first dynamically generated page on Witter. All that remains is to implement the remaining functionality such as the Wall and the Search page which we’ll pick this up in the next post.
Twitter Clone Tutorial in Web2py Part 1 – Getting started
Welcome to my getting started with Web2py tutorial.
This tutorial assumes very little on the part of the reader, some knowledge of a programming language will certainly help, but if not don’t worry. I’ll take you from installation through to v1 of your application.
If you don’t want to copy from the tutorial, the full source is hosted on github.
Why Web2py?
Web2py is a fantastic web development framework for Python, it focuses on
- Ease of use
- Rapid development
- Security
Additionally it had a excellent documentation and a highly responsive mailing list, these factors combine to make it a great place to start for those new to web development and programming in general.
To give an idea of just how easy it is to get going this tutorial we will build a twitter clone from scratch – nothing too flashy, but enough to demonstrate some core ideas to get you going.
The Twitter Clone – Witter
We’ll call the app Witter and steal other Twitterisms such as weets and weeting.
The app will be made up of three pages
- A home page, that displays all the weets of the user as well as those of anyone they follow
- A wall page, that displays profile details of a given user as well as their weets
- A search page that can be used to find others users and follow and unfollow
Getting Web2Py
There are a number of ways to do this, the easiest is to download the binary packages available for OS X and Windows. The binaries includes everything you need including a Python interpreter and an integrated development environment. Linux users will need to download the source, if you are comfortable with Linux I’m going to assume that you are comfortable with installing web2py.
Once downloaded you have everything you need and it is time to start web2py for the first time.
On OS X you’ll want to copy your newly downloaded file to your Applications folder, then double click just as you would any normal application to launch.
On Windows, copy web2py.exe to Program Files and double click to launch:
When prompted enter an admin password, and click ‘Start Server’ and soon after you will be presented with the web2py welcome app.
This is great place to start, including some useful examples and documentation, for now just click on the ‘Administrative Interface’ button on the right hand side to reach the site view of the administrative interface.
Creating your new application
The first thing to do is to create the new application, on the right hand side under ‘New Simple Application’ enter ‘witter’, this will be the name of our Twitter clone. With a bit of luck you are now looking at the Witter administrative interface – we are going to spend some time taking a tour of this page, but before we do that let’s head to the Witter home page. In a separate tab point your browser to
Congratulations – this is your brand new application, you’ll notice that it looks very similar to the welcome application, it is just using the same default content. We soon get rid of that in the next post as we start in earnest on Witter.
Reasons I love working in software
It all comes down to two things
- I get to work with people who really love what they do.
- I get to work with people who are insanely open to change.
‘We only hire the best’ – I don’t believe you
 Ask anyone about hiring developers and the advice is always the same ‘only hire the best’. The principle reasons being that
- Developer productivity can vary by an order of magnitude between apprarently similarly qualified candidates.
- The best people only want to work with the best people. A graders hire A graders, B graders hire C graders.
On the face the face of it this seems like great advice, who wouldn’t want to hire the best? It turns out pretty much everybody.
For instance, how long are you willing to wait to fill the position? What if you are really really stretched? What if you’re so stretched that you worry for existing staff? What if hiring a specific individual will mean huge disparities in pay between equally productive staff? What if not making the hire is difference between keeping a key client or losing them? At some point every company has to draw a line and elect to hire ‘the best we’ve seen so far’.
The difference between the great companies and the rest is how to deal with this problem. Great organisations place recruitment at the centre of what they do. If hiring is genuinely everyone’s number one priority then hiring the best becomes more achievable. For starters you might even have half a chance of getting ‘the best’ into your interview room in the first place.
Of the rhetorical questions posed above, in all cases the impact can minimised (though not eradicated) so long as management understands and anticipates the challenges in recruitment. For example “What if hiring them will mean huge disparities in pay between equally productive staff?” A company that intends to hire the best understands the value of keeping the best. So compensation of existing staff, especially longer serving staff relying on annual raises to ensure market parity, must be at an appropriate level. Doing so can be hugely expensive when multiplied over all employees and this cost comes directly from the bottom line. Companies that put recruitment at the core are willing to make the investment. Yishan Wong’s writing on this subject is brilliant.
If hiring really is everyone’s number one priority then there is a trade off to make, something has been deprioritised or sacrificed to make room. As a result hiring is much more than a partitionable activity, it is a statement of corporate identity. Proclamations like “we only hire the best” are meaningless without an understanding of the trade offs and sacrifices made.
In Praise of Continuous Deployment
It doesn’t matter if you get there, every step along the way is an improvement.
Me, praising Continuous Deployment
Ever since coming across the idea on Eric Ries’s blog I’ve always been a big fan of Continuous Deployment. For those unfamiliar with the term, it means writing your code, testing frameworks and monitoring systems in such a way that it is possible to completely automate the process of going from source control commit to deployment to a live system without posing a quality melt down. This means teams can find themselves deploying 50 times a day as a matter of course.
It’s not without it’s critics, and a lot of people see this as one way ticket to putting out poorly tested buggy code. I think that those folk completely miss the point and that in many scenarios in fact the opposite is true. The thing I really like though, is that, whether or you ever get to the point of automatically deploying every commit to live, every step that you might take to get there is hugely positive.
So, really, what would have to happen in order to employ a Continuous Deployment regime?
18 months ago my then team started to take this idea more seriously, I thought it would be interesting to give an overview of the steps taken towards Continuous Deployment, and since we’re certainly not there yet, what we plan to do in the future.
We started from a point where we would release to live environment every few weeks. Deployments, including pre and post deploy testing could take two people half a day sometimes more. I should also say that we are dealing with machine to machine SaaS systems where the expectation is that the service is always available.
Reduce manual deployment load
Our first efforts aimed to reduce the human load on deployment through automation. Fear meant that we still needed to ssh into every node to restart but every other step was taken care of. This meant that it eventually became common place to deploy multiple times a week across multiple platforms.
Improve system test coverage
Once a deploy was live we were still spending considerable time on behaviour verification. To address this we worked to improve our system and load testing capability. Doing so meant that we had more time to manually verify deploy specific behaviour, safe in the knowledge that the general behaviour was covered by the tester.
Improve system monitoring
This approach also requires a high level of trust in system monitoring. We have our own in house monitoring system whose capabilities we expanded during this period. In particular, we improved our expression language to better state what constituted erroneous behaviour and we also worked on better long term trend analysis, taking inspiration from this paper . It’s no surprise to me that it came out of IMVU who have been practicing Continuous Deployment for a long time.
Reduce deploy size
Since the act of deployment was now much less expensive we looked to reduce the number of changes that went out in each deploy. At first this felt false, after all if the user can’t use the feature in it’s entirety, what’s the point? We soon realised that smaller chunks were easier to verify and sped us up over time. We took an approach that I’ve since heard referred to as ‘experiments’ so that new functionality could be deployed live but was hidden from regular users. It meant that we could demo new functionality in production, without disrupting the business as usual service.
Embrace lean inspired methodology
Breaking down deploys into a few day’s worth of work also improved our lead time meaning that we could more responsive in the event of a change of plan. It was during this period that we switched from time boxing to Kanban. This is interesting since Continuous Deployment is often championed by the lean startup movement.
The future
More recently, actively pursuing Continuous Deployment has taken a back seat, but the next logical steps could be to further flesh out the system test coverage and then look to completely automate deployment to the staging environment (modulo database changes).
However, it doesn’t really matter what we do next, if it takes us a step closer to theoretically being able to deploy continuously it will undoubtedly improve our existing lead time and responsiveness.
This post contains a number of Continuous Deployment resources, but a few further articles I found to be interesting follow include:-
- http://radar.oreilly.com/2009/03/continuous-deployment-5-eas.html
- http://timothyfitz.wordpress.com/2009/02/10/continuous-deployment-at-imvu-doing-the-impossible-fifty-times-a-day/
- http://toni.org/2010/05/19/in-praise-of-continuous-deployment-the-wordpress-com-story/
- http://theagileexecutive.com/2010/07/01/technical-debt-meets-continuous-deployment/
How I Manage Technical Debt
 In the previous post, Technical Debt is Different, I talked about the need to treat management of technical debt as a separate class of problem to that of feature requests generated outside of the team.
As with any project above a certain size, team collaboration is key, and that means having a reliable method of prioritising technical debt that the whole team can buy into. This post will describe a method that I have been using over the past year that satisfies this need.
Identify
I was new to my current the project and wanted to get an idea from the team of the sorts of things that needed attention. I mentioned this just before lunch one day and by the time I got back from my sandwich I had an etherpad with over 100 hundred items. By the end of the afternoon, I discovered that etherpad really doesn’t deal with documents above a certain size.
It was clear that we needed to a way to reference and store these ideas, I had two main requirements.
- It was easy to visualise the work items
- An easy, non-contentious way to assign priority
The first step was to go through the list and group items into similar themes, this helped identify duplicate or overlapping items. At this stage some items were rewritten to ensure that they were suitably specific and well-bounded.
Prioritise
Now that we had a grouped list of tasks it was time to attempt to prioritise. As discussed in the previous post, prioritising refactoring tasks can be challenging and passions are likely to run high. I felt that rather than simply stack ranking all items, it was better to categorise them against a set of orthogonal metrics. This led to a much more reasoned (though no less committed) debate of the relative merits of different tasks.
Every item was classified according to:-
- Size
- Timeliness
- Value
Size
The simplest metric, this is a very high level estimate of what sort of size the item was likely to be. Estimating the size helped highlight any differences in perceived scope, and in some cases items were broken down further at this point. Size estimation works best when estimates for tasks are relative to one another, however to seed the process we adopted the following rough convention.
- Small – A week
- Medium – 2 weeks
- Large – 3 weeks for 2 people
Timeliness
Timeliness speaks of how the team feels about the task in terms of willingness to throw themselves into it. Items were assigned a timeliness value from four options.
- ASAP – There is no reason not to do this task right now. Typical examples include obvious items that the team were all highly in favour of, or items that the team had been aware of for some time and feel that enough is enough.
- Opportunity – An item that lends itself to being worked on while the team is already working in the area.
- Medium term – An item that is thought of as a ‘wouldn’t it be nice some day’. The items are typically riskier than ASAP or Opportunity and the team need to really commit to it’s execution before embarking on the item.
- Long term – Similar to medium and generally populated by reviewing the medium section and selecting items that are imposing or risky enough to postpone behind other medium tasks.
Value
How much will the team benefit from the change? Is it an area of the code base that it touched often? Perhaps it will noticeably speed development of certain types of features. It could be argued that Value is the only metric that matters, however Value needs to be considered in the context of risk (addressed through timeliness) and effort (addressed through size).
All items for a given Timeliness are measured relatively and given a score of ‘High’, ‘Medium’, ‘Low’. Low value items are rarely tackled, and even then, only if they happen to be in the Opportunity category.
Visualise
Once all items had been classified, it is time to visualise the work items. To do this we transferred the items to cards and stuck them to a pin board, with timeliness on the horizontal axis and value on the vertical axis (each card contained a reference to the task size). Now it was possible to view all items at once, and from this starting point much easier to make decisions over which items to take next.
Since the whole team had contributed to the process it was clear to individuals why, even though their own proposals were important, that there was greater value in working on other items first. Crucially, we also had a process to ensure that these mid-priority items were not going to be forgotten and trust that they would be attended to in due course.

When a task is completed, we place a red tick against it to demonstrate progress, this helps build trust within the team that we really are working off our technical debt. Sometimes a specific piece of work, as a side effect, will lead to the team indirectly making progress against a technical debt item. When this happens we add a half tick, indicating that this card should be prioritised over other similarly important items so that we get it finished off completely.
Tiny Tasks
This system is effective in reducing the stress that comes with managing technical debt and provided a means for all the team to have a say in where the team spent their effort. However, one area where it is weak is in managing very small, relatively low value tasks that can be completed in an hour or so. Examples might include removing unused code, reducing visibility on public fields, renaming confusingly named classes – in essence, things that you might expect to happen as part of general refactoring were you already working in the area.
To manage these small easy wins, the team maintains an etherpad of ‘Tiny Tasks’ and reviews new additions to the list on a weekly basis. The rule is that if anyone considers a task to be anything other than trivial it is thrown out and considered as part of the process above. These tasks are then picked up by the developer acting as the maintainer during the week.
So what does it all mean?
Generally it is easier if an individual has final say of the prioritisation of tasks, in the case of technical debt this is harder since the whole team should be involved. Therefore, a trusted method of highlighting and prioritising technical debt tasks is needed. By breaking down the prioritisation process into separate ‘Size’, ‘Timeliness’ and ‘Value’, it was possible to have more reasoned discussion over the relative merits of items. Visualising the items together at the end of the categorisation process enables the team to make better decisions over what to work on next and builds trust that items will not be simply forgotten. Very small items can still be prioritised if the team agrees that they really are trivial.
Technical Debt is Different
Technical debt is great metaphor to describe what happens to your code base if you don’t continually keep it clean and tidy.
Any Software team accrues technical debt either intentionally to satisfy a short term win, or unintentionally as the design and requirements of a system drift over time. It’s a subject that has been written about extensively and I particularly liked NRG’s attempts to track it as part of their weekly metrics (you’ll want slide 9).
Why is technical debt so different?
The thing I’ve noticed about servicing technical debt is that it is very different from other work a team might undertake and that it requires an alternative approach to manage it. The principal differences that I see are:-
- It has no immediate business value
- Requires an enlightened company to acknowledge its importance
- Often occurs ‘under the radar’
- Almost always proposed by the development team
- Since the dev team own it, specific work items will be prioritised through a different process to standard feature requests.
- The dev team may be more emotionally tied to the work
- Since there are no behavioural changes, definition of done is less clear
I am fortunate to work for a company with strong engineering leadership that acknowledges and makes provision for the servicing of technical debt. However, even if the argument for technical debt has been won, deciding how best to tackle debt can be highly contentious and in some cases destructive.
So what’s the problem?
The biggest problem is that of prioritisation. In many agile teams you would hope to have a single product owner who can make prioritisation decisions for product features, in practice this can be hard for an organisation to provide but the key point is that it’s important to minimise the number of final decision makers.
In the case of technical debt it is the dev team that decides, which means thrashing out the priorities across the entire team. Each developer will have a different, often very strong view, on what is important and arriving at a conclusion can be a long and painful journey. Additionally, existing project prioritisation tools such as MoSCoW do not lend themselves to technical debt prioritisation.
A trusted means to prioritise tasks makes it possible to identify a team wide strategy. Without a clear strategy there is the temptation for individuals to ‘go it alone’, this means that over time the overall impact is reduced. Firstly, larger items that are too big for one person are ignored and secondly, if it is not possible to decide on what is important, then collaboration becomes difficult. This means that the impact of smaller items is also diminished since they will feed into the individual developer’s strategic vision rather than that of the team’s overall vision. This in itself can become toxic as it breaks down trust within the team and further hampers collaboration. Rachel Davies has a great post describing the effects of self orientation on team trust.
The fact that technical debt is being tackled at all is a good thing, but it would be nice to do this in an efficient a way as possible. My team and I already spend a significant amount energy on improving our ability to deliver valuable software in a consistent fashion and our approach to managing technical debt should be no less disciplined. The only difference is that this time around, we are our own customer.
The solution
It’s clear that some form of prioritisation method is necessary, but committees are generally not a good way to make decisions. One approach is to assign a final decision maker, perhaps a tech lead or senior member of the team, but I really want a system where the entire team buys into the process. If the process is right then it should be rare for someone to have to say ‘this is how it is’.
Over the past year I’ve been working on a system to better manage my team’s technical debt, in my next post I’ll go on to explain the approach.
Why I don’t use bug tracking software – slides
In addition to speaking on Kanban at XP Day 2010 I also gave a short lightning talk based on my earlier fragile posts on bug tracking (1,2). Initially I was apprehensive about standing up in front a room of agilistas and telling them I’d dispensed with digital bug tracking, but since the previous session had been about throwing everything out (really really everything, just deploy to live), I felt positively conservative.
And another thing about TDD
So things have been hectic over the past few months and fragile has taken a back seat, but I thought I’d relay the following since I thought it was pretty cool.
At a recent one on one, I was asking one of my developers how he’d found trialling TDD on a recent project. He said that while at first he’d found it uncomfortable, once he got going it felt great. Aside from any benefits in design he raised a very interesting point that I’d not considered before. He noted that when writing tests after the implementation the test and the implementation often looked very similar. This meant that not only is the test likely to be more fragile over time, it is also more likely to duplicate any bugs already present in the implementation. By writing the tests first this problem disappears, since the test is more concerned with intent and the implementation itself is yet to be considered.


