Welcome to my getting started with Web2py tutorial.
This tutorial assumes very little on the part of the reader, some knowledge of a programming language will certainly help, but if not don’t worry. I’ll take you from installation through to v1 of your application.
If you don’t want to copy from the tutorial, the full source is hosted on github.
Last time we set up Web2py and created our application, Witter. This time around we’ll down and dirty with writing our own functionality, but before we do that, let’s register ourselves since it will save us a job later.
Register a new user
From http://127.0.0.1:8000/witter Click ‘Login’ on the top right and then ‘Register’, enter your detail into the form and hit submit. Welcome! You are the first ever user of your application.
While this is extremely cool, it will be even cooler once Witter actually does something, and for that we need to work with the Admin interface.
The Admin Interface
The Admin interface can be found at from http://127.0.0.1:8000/admin/default/design/witter and provides access to all the files you will need to create your application, there is a lot to take in, and for now we are are going to focus on three sections that we will be editing extensively – The Models, the Views and Controllers.

Model-View-Controller MVC
Before we go any further I need to explain some theory. Model-View-Controller or MVC is highly popular web application design pattern. This means that over many years of sweat and toil it is generally considered to the be the best way to lay out your code. It is certainly not the only way, and there are many MVC variations, but Web2py is rather fond of the MVC pattern and this is what we’ll use to create Witter.
So what does working with MVC mean?
We let’s start by defining some terms, I’m going to steal directly from wikipedia
Model–view–controller (MVC) is a software architecture pattern which separates the representation of information from the user’s interaction with it.[1][2] The model consists of application data, business rules, logic, and functions. A view can be any output representation of data, such as a chart or a diagram. Multiple views of the same data are possible, such as a bar chart for management and a tabular view for accountants. The controller mediates input, converting it to commands for the model or view.[3] The central ideas behind MVC are code reusability and separation of concerns.[4]
It goes onto to define the role of each component
In addition to dividing the application into three kinds of components, the MVC design defines the interactions between them.[5]
A controller can send commands to its associated view to change the view’s presentation of the model (e.g., by scrolling through a document). It can also send commands to the model to update the model’s state (e.g., editing a document).
A model notifies its associated views and controllers when there has been a change in its state. This notification allows the views to produce updated output, and the controllers to change the available set of commands. A passive implementation of MVC omits these notifications, because the application does not require them or the software platform does not support them.[6]
A view requests from the model the information that it needs to generate an output representation to the user.”
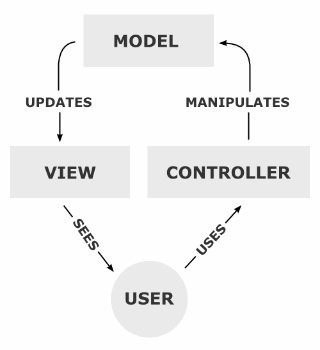
In summary, we define how our data will be laid out in the Models, define how it will be presented in the Views and define how the user can interact and modify it in the Controller.
Right now, you might be wondering why this is all so important. For the moment I’m going to ask you to trust me, and work safe in the knowledge doing so will save you time, effort and save the lives of puppies.
Getting going – the Models
Okay, so we have the application up and running, we are now armed with the necessary theory, it’s time to dive in. This is where is really starts to get interesting.
We’ll start with the Models, we can actually reuse the existing ‘db’ Model file, so click edit and we’ll take a look around. You’ll notice that there is a lot of information here, along with housing our data Model the db file also provides some initialisation and sensible defaults for our application.
By all means take a look through but I want to call two lines of special interest:-
db = DAL('sqlite://storage.sqlite',pool_size=1,check_reserved=['all'])
DAL stands for Database Abstraction layer, and provides an API that maps Python objects into database objects. We will make extensive use of the DAL in our application. In this case we are using an SQLite database to back the DAL. Using SQLite will make absolutely no difference to how we write our application since we talk to the DAL not the database. This means that we can swap in and out databases as we please. To start with SQLite is the perfect choice to get going quickly, though we would want something meatier for a production environment.
auth = Auth(db)
Auth is a class that implements, the Web2py role based authorisation API, this will allow us to provide for user registration, login as well as restricting access to certain pages. For instance, once I have registered, it will provide me with a form to let me change my password, and at the same time ensure that I am the only person who can view it.
At the beginning of this tutorial I referenced the Web2py stated goal of Security. Auth and the DAL abstract many of these concerns on behalf of the developer. For instance the DAL makes it impossible to succumb to an SQL injection attack.
In addition to the concept of a user, we will need two additional entities – (t)weets and followers.
Add the following to the bottom of the db.py Model file
# a table to store posted weets
db.define_table('weets',
    Field('body','text',requires=IS_LENGTH(140,1),label="What's going down?"),
    Field('posted_on','datetime',readable=False,writable=False),
    Field('posted_by','reference auth_user',readable=False,writable=False))

#a table to store follower relationships
db.define_table('followers',
   Field('follower','reference auth_user'),
   Field('followee','reference auth_user'))
#Convenience methods to make code more compact
me = auth.user_id

def name_of(user): return '%(first_name)s %(last_name)s' % user
So for a weet we store the body that must not exceed 140 characters, when it was posted and by whom.
Separately, in followers, we store which users follow which other users, each relationship has it’s own entry in the same. ‘auth_user’ is reference to the auth_user table defined by Auth and by explicitly calling out the relationship we ensure that it is not possible to add bogus data into the followers table.
We’ll side step ‘me’ and ‘name_of’ for now and revisit them as they come up later.
Save the default.py and click on ‘edit’ that sits on the top nav bar, this will return you to the Witter admin page from here we need to edit the menu.py Model file. This file configures the look of the menu and also houses meta data about the application.
Remove the existing content and enter the following in menu.py
response.title = "Witter"
response.subtitle = "Super Awesome Twitter Clone in Web2py"
response.menu = [
(T('Home'), False, URL('default','home')),
(T('Wall'), False, URL('default','wall')),
(T('Search'), False, URL('default','search')),
]
This code sets the apps name and sub-title as well as defining the links on the navigation bar.
With the data Model out of the way, it is time to look at Controller file. Once again, save the menu.py and click on ‘edit’ that sits on the top nav bar, under Controllers click edit on ‘default.py’.
default.py also comes with some pre-existing content, you’ll notice a user method – this ties in with the Auth class we came across in the Model exposing functionality to manage user registrations and logins.
So far everything we have seen, has focused on definitions. In the Controllers we will start to use python in anger to determine how our application should behave. I will not attempt to provide an introduction to python in this tutorial but will recommend the Web2py python introduction as well as Zed Shaw’s Learn Python the Hard Way(‘The hard way is easier’).
The Home Page Controller
Our first custom Controller method will be the home page, this is the page from which we can post a weet as well as listing weets from other users that we follow – it also contains our own weets.
Every method in the Controller is exposed by the application, so let’s have a play. Add a new method called ‘home’ like so, adding to the bottom of the file is fine.
def home(): return "Hello from Witter App"
Now point your browser to http://127.0.0.1:8000/witter/default/home
You should see a page empty but for your message. Take a look at the url for a moment – witter is the application, default is the Controller file and home is the specific method. This means that we can write multiple Controller methods and reach them via the same URL scheme changing the final element to match the new method name.
Getting the home method working is good going, but if Witter is going to challenge Twitter on the big stage we are going to need to make some changes.
Replace your previous home method with the following, this is the Controller action for the home page.
@auth.requires_login()
def home():
   '''First point of call, contains all weets and all weets of those you follow'''
   #configure defaults, so they not appear on the form
   db.weets.posted_by.default = me
   db.weets.posted_on.default = request.now
   #create form with which the user can submit weets
   crud.settings.formstyle = 'table2cols'
   form = crud.create(db.weets)
   #determine who the user follows
   my_followees = db(db.followers.follower==me)
   me_and_my_followees = [me]+[row.followee for row in my_followees.select(db.followers.followee)]
   #Pull all weets to be displayed
   weets = db(db.weets.posted_by.belongs(me_and_my_followees)).select(orderby=~db.weets.posted_on,limitby=(0,100))
   return locals()
Woooh! Hold on now, there is a lot going on here. Let’s go through this slowly.
This method uses both ‘db’ and ‘me’ that we defined earlier in the db.py Model. Any variable defined in a Model file is automatically available in all Controllers (and Views). This why we can use these variables without needing to formally import them.
So every time we see ‘db’ we know that some activity against the DAL and therefore the database is going to occur. Similarly every time we see ‘me’ we know it refers to the user who is logged in.
So, back to the home method. The very first line
@auth.requires_login()
Is a method decorator that ensures that this page is only accessible to logged in users. Users not logged in, will be redirected to the login page.
Next we assign some default values to fields in the weet entity before using the crud plugin (also defined in db.py) to auto-generate a form for us. This is the form that we will use to post weets. Crud stands for Create, Read, Update, Delete I don’t want to dwell on it too much for now, other than to say it is a useful tool to create forms and validation logic.
Next we need to pull out the weets that those that we follow have weeted, as well as pulling out our own. The final lines act on the DAL to select out the relevant details to pull out only the weets we are interested in.
Finally we return ‘locals()’ this makes the method’s local variables available to the View, which we will go into in just a second. We have one final task before leaving the Controller and that is to replace the index method with:-
def index():
   if auth.user: redirect(URL('home'))
   return locals()
The index is the default Controller and is where you end up after naviagting to http://127.0.0.1:8000/witter This method simply checks if you are logged in and if so redirects to the ‘home’ page. If not you are presented with the default landing page that you saw when you first started up Web2py.
Now to learn more about Views
The Home Page View
Remember the View is there to present the information stored in the Model, after processing via the Controller. Separately, as we shall see, it also provides the user a means to interact with the application via the Controller.
In the first attempt at the home method ‘’Hello from Witter App” we made use of the default View. The default is useful for checking that everything is working but for a high quality application such as Witter we will need something more sophisticated.
From the application adminstration page scroll down until you see the Views section and create a new file called default/home.html The path of the file denotes that it is the View of the default/home Controller.
Replace the default code with the following:-
{{extend 'layout.html'}}
{{=form}}
$('textarea').css('width','600px').css('height','50px');
{{for weet in weets:}}

{{=name_of(weet.posted_by)}} on {{=weet.posted_on}}:
{{=MARKMIN(weet.body)}}

{{pass}}
I’ll explain what the View is doing in second but for now, just save the file and point your browser at http:127.0.0.1:8000/witter/default/home If you are no longer logged in you will be prompted to provide your username and password.
This is your landing page – what a difference! Along the top left we have the Witter navigation controls, which we specified in the menu.db Model and immediately underneath a text area in which to enter weets.

Initially, there isn’t very much to see. The next step is to go ahead and make a weet (you can see weets from multiple users in the picture above). Enter some timeless phrase into the text area and hit submit. The page will refresh and low and behold your weet is preserved for eternity.
So how on earth has this happened? Let’s go back to the default/home.html View.
The View is standard html file and as you might expect contains html tags to mark up the content, but it also contains some lines enclosed by ‘{{ }}’. The contents of these lines are Python and allow you to dynamically create the page content.
The first line draws in the layout.html file, this is base template that provides things like a nav bar and a footer and generally makes our page look a bit more like a website. You can take a closer look from the application admin interface under Views.
Next up, we enter the form as created in the ‘home’ Controller, before modifying the size of the text area in the <script> tags.
Here’s where it starts to get interesting. In the Controller we specified a variable called weets that contained details of all the weets to display on the page.
The View loops through all the weets
{{for weet in weets:}}
For each one it displays how weeted, when, and then the body of the weet. The reason this is so interesting is that the content has been created dynamically and is entirely dependent on the weets pulled from the Controller.
So we have out first dynamically generated page on Witter. All that remains is to implement the remaining functionality such as the Wall and the Search page which we’ll pick this up in the next post.

Hi this is an excellent tutorial but I’ve happen to come across a few snags on mine. When I tried viewing the home page, it returns an internal error saying that the “name ‘form’ is not defined’. Any ideas? I followed everything to the dot.
LikeLike
@Marky, sorry to hear that, have you tried taking a look at my reference code on github, I’d be interesting to know if you still have the same problem, perhaps you can find a difference by diffing the files? https://github.com/neilisfragile/witter
From your description it sounds like the form has not be defined in the controller.
LikeLike
After completing The Home Page View section I tried going to 127.0.0.1:8000/witter/default/home and got an error ticket telling me that crud wasn’t defined, after googling I added the following to the bottom of the db.py Model file
from gluon.tools import Crud

crud = Crud(db)
This seems to have solved the error
LikeLike
Many thanks, David. I had the same error.
LikeLike
it no longer works , curd is deprecated. it giving me errors on every step
LikeLike